
Sourdough Chocolate Chip Cookies
The perfect combination of tangy sourdough and sweet chocolate chips
These chewy, fudgy cookies with crispy edges are everything you love about chocolate chip cookies—but with a subtle sourdough tang that makes them completely irresistible.
Equipment
- Cookie scoop (1½ tablespoon)
- Baking sheets
- Parchment paper
Ingredients
- 1 cup all-purpose flour
- ⅓ cup natural unsweetened cocoa powder
- ½ teaspoon baking soda
- ½ teaspoon salt
- ½ cup unsalted butter, softened
- ½ cup light brown sugar
- ½ cup granulated sugar
- 1 large egg
- 2 teaspoons vanilla extract
- ⅓ cup sourdough discard
- 1 cup semisweet chocolate chips (+ more for topping)
- 1 teaspoon flaky sea salt (optional, for topping)
Instructions
- Preheat the oven to 375°F (190°C). Line two baking sheets with parchment paper and set aside.
- In a medium bowl, sift together the flour, cocoa powder, baking soda, and salt. Set aside.
- In a large mixing bowl, beat the softened butter, brown sugar, and granulated sugar on medium speed for about 2–3 minutes, until light and fluffy.
- Beat in the egg and vanilla extract until fully incorporated. Add the sourdough discard and mix just until combined. Scrape down the sides of the bowl as needed.
- With the mixer on low speed, gradually add the dry flour mixture to the wet ingredients. Mix until just combined—do not overmix.
- Fold in the chocolate chips gently, ensuring they are evenly distributed.
- Use a 1½ tablespoon cookie scoop to portion dough onto the prepared baking sheets, spacing cookies about 2 inches apart.
- Bake cookies for 9–11 minutes, or until the edges are set and the centers no longer look glossy.
- Allow cookies to cool on the baking sheet for 5 minutes before transferring to a wire rack to cool completely.
- Optional: While the cookies are still warm, press a few extra chocolate chips into the tops and sprinkle with flaky sea salt.
💡 Pro Tips
- Room temperature ingredients blend better—set butter out 30 min before baking
- Don't overmix once flour is added to keep cookies tender
- Under-bake slightly for fudgy centers, bake longer for crispier edges
- The sourdough discard adds moisture—expect a slightly different texture than classic recipes

Sourdough Lemon Blueberry Muffins
Bakery style muffins that are fluffy yet moist with juicy berries and a lovely hint of lemon
A delicious way to use your sourdough starter discard! These bakery-style muffins are fluffy yet moist with lots of juicy blueberries and a lovely hint of lemon.
Equipment
- 6-cup muffin pan
- cupcake liners or non-stick spray
- Large mixing bowl
- 1/4 cup muffin scoop
Ingredients
- 1¼ cups all-purpose flour
- ½ cup granulated sugar
- ½ teaspoon salt
- 2 teaspoons baking powder
- ⅓ cup canola oil
- 1 large egg, room temperature
- ⅓ cup almond milk, room temperature
- ½ teaspoon lemon oil (or 1 tsp lemon extract/zest)
- ¼ cup sourdough discard
- 1¼ cups blueberries (fresh or thawed frozen)
- 2 teaspoons coarse sugar for tops
Instructions
- Preheat oven to 375°F. Line a 6-cup muffin pan with cupcake liners or spray with non-stick cooking spray.
- In a large bowl, whisk together the dry ingredients—flour, sugar, salt, and baking powder.
- Add the milk, egg, oil, sourdough discard, and lemon oil. Gently stir together with a large rubber spatula until all ingredients are completely combined. Do not over-stir or your muffins will be dry.
- Fold in 1 cup of the blueberries. Scoop batter into the prepared muffin pan using a 1/4 cup muffin scoop.
- Place a few more blueberries on top of each muffin, using the remaining ¼ cup of blueberries. Gently press the berries into the batter slightly.
- Sprinkle coarse sugar on top of each muffin.
- Bake muffins for 26-28 minutes or until a toothpick inserted in the middle comes out clean.
- Let cool slightly and serve. Best when fresh!
💡 Substitutions
- Lemon Oil: Substitute 1 teaspoon of lemon extract or 1 teaspoon of lemon zest
- Sourdough Discard: Omit and add 2 tablespoons flour + 2 tablespoons almond milk
- Almond Milk: Use any milk—whole, 1%, 2%, or dairy-free alternatives
- Storage: Room temperature for 1 day, refrigerator for 5 days, or freeze for 2 months

Sourdough Tortillas
Soft, delicious homemade tortillas made with leftover sourdough starter
These Sourdough Tortillas are made with leftover sourdough starter. They are soft and delicious—the best tortillas you'll ever have!
Equipment
- Stand mixer with dough hook (or hand kneading)
- Rolling pin
- Cast iron or non-stick frying pan
- Baking sheet
- Kitchen scale
Ingredients
- 125g sourdough starter discard (½ cup, 4.5 oz)
- 320g warm water (~120°F) (1⅓ cup, 11 oz)
- 56g vegetable oil (¼ cup, 2 oz)
- 2 teaspoons kosher salt
- ½ teaspoon baking powder
- 637g all-purpose flour (5 cups, 22.5 oz)
- Extra flour for dusting
Instructions
- Mix sourdough starter, water, oil, salt, baking powder, and 4 cups of flour in the bowl of a stand mixer and knead with the dough hook for 4-6 minutes, until dough comes together in a smooth, non-sticky ball.
- If the dough is too sticky, start adding the remaining cup of flour until you obtain the necessary consistency. You may not use the whole cup of flour—add slowly until you reach a dough that isn't too sticky or too dry.
- You can also mix the ingredients with a wooden spoon and then knead by hand.
- Once you're done kneading, place dough in a lightly oiled bowl, cover with a towel or plastic wrap and let it rest at room temperature for about 30 minutes.
- Divide the dough into about 32 equal pieces. Use a scale to measure out dough—about 30 grams per piece works well.
- Using the palm of your hands, roll each piece of dough into a ball by making a circular motion, pressing down slightly against the counter. Use very little flour for traction.
- Cover dough pieces with a towel and let them rest for 5 minutes.
- Start rolling each dough piece into a circle about 7 inches in diameter.
- Heat up a cast iron frying pan or non-stick frying pan over medium high heat.
- When the pan is hot, add a tortilla. Cook on one side for about 1 minute, flip it over and cook on the other side for about 30 seconds.
- You don't want your tortilla to burn—cook until it's just slightly browned. If you burn your tortillas, they might become hard after they cool down.
- Lay out cooked tortillas on a baking sheet and let them cool slightly before placing them in a tortilla warmer or closed container.
💡 Pro Tips
- If kneading by hand, the dough will take longer to become soft—about 6 to 7 minutes.
- A pasta machine works great for rolling out the dough pieces!
- Use 2-3 pans to speed up the cooking process.
- Don't immediately put hot tortillas away or they will become soggy.
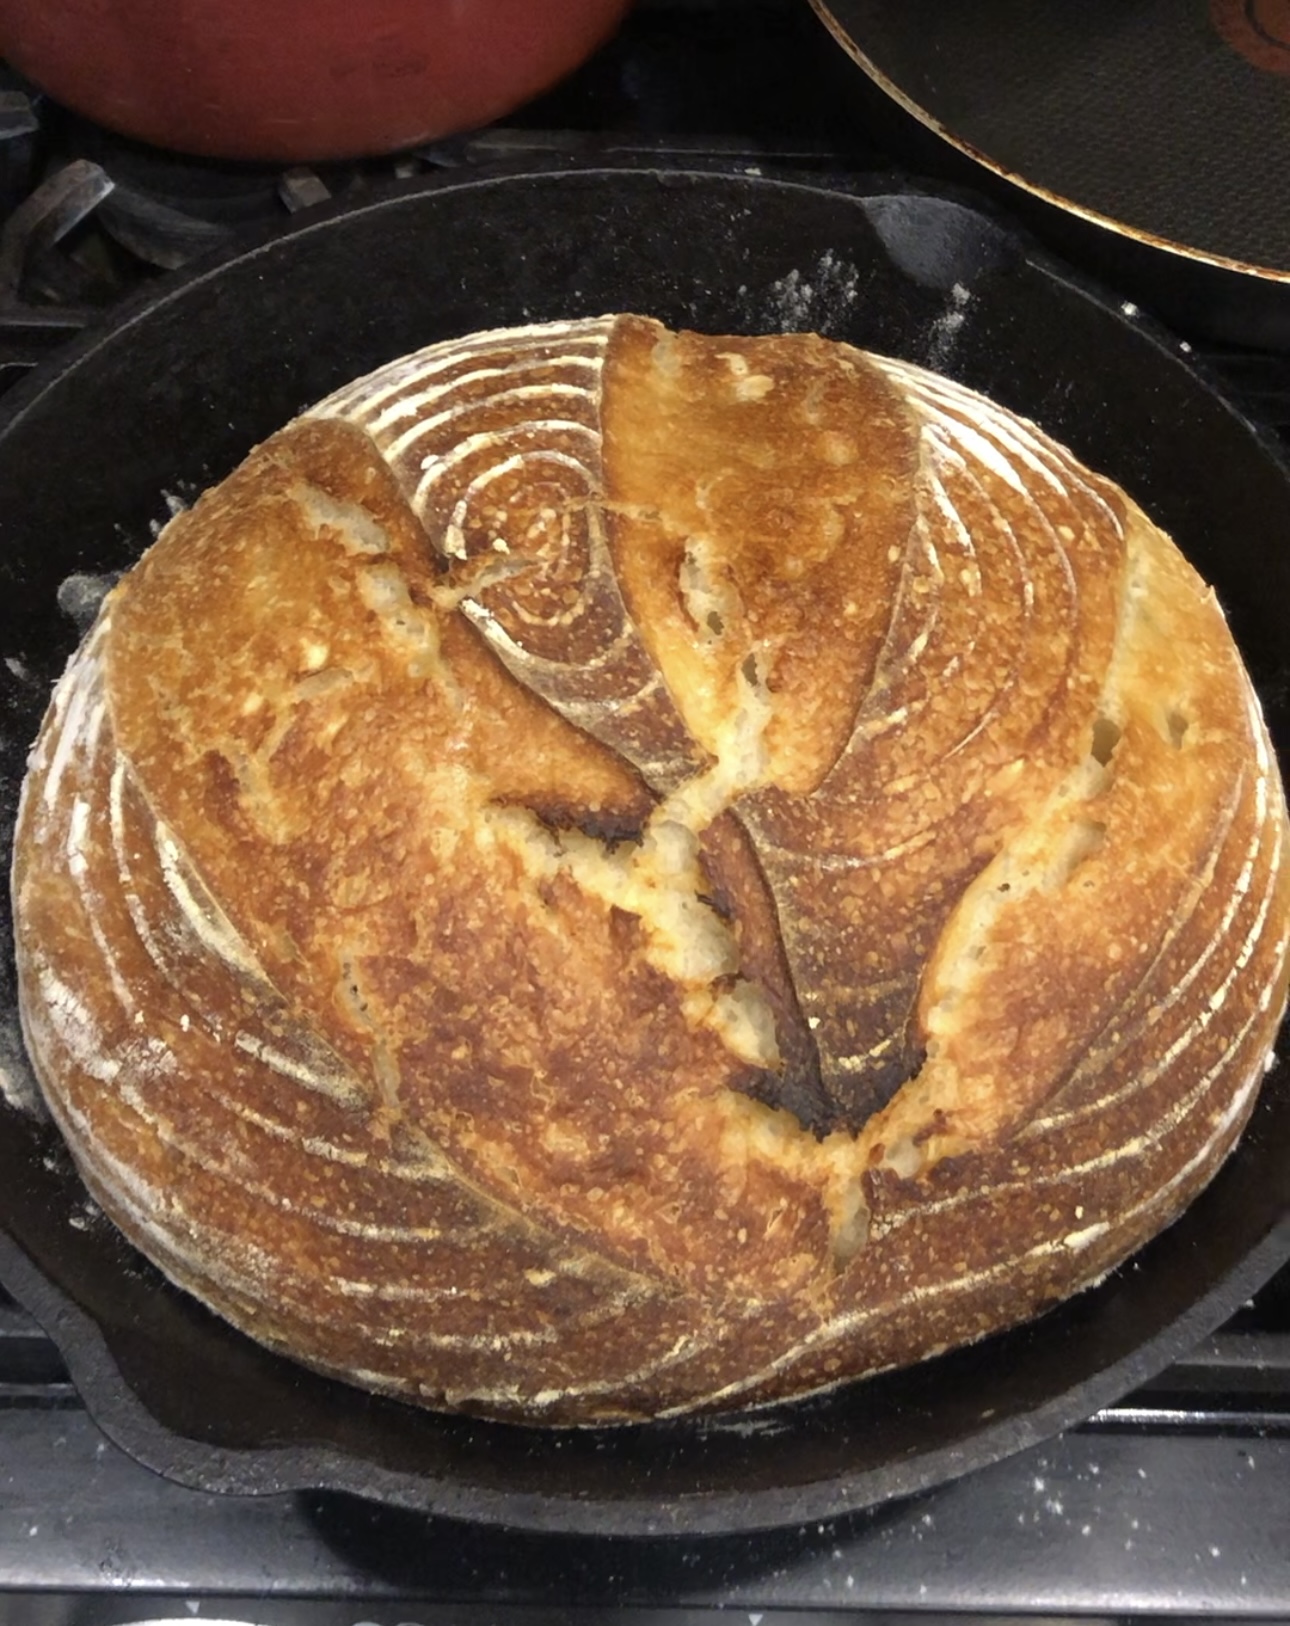
Artisan Sourdough Bread
A beautiful rustic loaf with a crispy crust and soft, airy interior
This recipe guides you through the complete process of baking beautiful sourdough bread at home. The process takes 1-2 days but the wait is worth it!
Equipment
- Dutch oven or oven-proof pot
- Proofing basket (banneton)
- Kitchen scale
- Lame or sharp knife
- Parchment paper
- Wire cooling rack
Ingredients
- 100g active sourdough starter
- 375g warm water (about 120°F)
- 500g bread flour
- 10g fine sea salt
- Rice flour for dusting
Instructions
- Feed Your Starter: Use a 1:1:1 ratio of starter, flour, and water by weight. Feed your starter 8-12 hours before baking to ensure it is bubbly and active. The starter is ready when it doubles in size and is aerated with bubbles throughout.
- Mix the Dough: Combine water and starter in a large bowl, then add flour and salt. Mix until no dry flour remains, forming a shaggy dough. Cover and let rest for 30-60 minutes (autolyse) to hydrate the flour and start gluten development.
- Stretch and Fold: Perform 4 sets of stretch-and-folds every 30 minutes. Wet your hands to prevent sticking, lift one side of the dough, fold it over itself, rotate the bowl and repeat. This strengthens the dough without kneading.
- Bulk Fermentation: Cover the dough and let it rise at room temperature for 5-10 hours, depending on your kitchen temperature. The dough is ready when it has increased 50-75% in volume, is slightly domed on top, and jiggles when you shake the bowl.
- Shape the Dough: Turn the dough onto a floured surface. Shape into a round boule by folding the edges under toward the center, creating surface tension on the top. Place seam-side up in a proofing basket dusted with rice flour. Rest 15-30 minutes, then reshape if needed.
- Proofing: Cold-proof in the refrigerator for 12-24 hours (recommended for deeper flavor and easier handling), or room temperature for 1-3 hours until slightly puffy.
- Preheat Oven: Set oven to 465°F / 240°C. Place an empty Dutch oven inside the oven to preheat. Cut parchment paper to fit the pot.
- Score and Bake: Transfer dough onto the parchment paper. Score the top with a lame or sharp knife at a 45 degree angle. Place in the preheated Dutch oven, cover, and bake for 30 minutes (this creates steam for better crust). Remove the lid and bake an additional 10-20 minutes until golden brown and crusty. Internal temperature should reach 200-205°F (93-96°C).
- Cool: Cool the loaf on a wire rack for at least 1 hour before slicing to allow the crumb to set properly.
💡 Pro Tips
- Use a kitchen scale for accurate measurements - baker's percentages matter
- Room temperature affects fermentation time - warmer kitchens = faster fermentation
- A cold start in the Dutch oven creates steam for better crust development
- Score deep enough (1/4 inch) - shallow scores may not open properly during baking
- The loaf is fully done when it sounds hollow when tapped on the bottom
- Do not skip the cooling time - cutting too early results in gummy bread